Wearbly for Shopify
Add virtual try-on to your Shopify store.
Add virtual try-on where shoppers choose their clothing. This guide takes you from app installation to a tested product page.
START WITH YOUR THEME
Before you start
- A Shopify store with the Online Store sales channel and clothing products.
- Permission to install apps, approve app charges and edit the store's theme.
- A product template and section that support app blocks. Online Store 2.0 themes can support them; your chosen product section must also allow them.
Make a theme copy before changing your storefront: in Online Store → Themes, open the theme's actions menu and choose Duplicate. Work on the copy and preview it before publishing.
1. Install the Shopify app
- Open the Wearbly AI listing in the Shopify App Store and select Install.
- Choose your store, review the requested permissions and confirm the installation.
- Open Wearbly AI from Apps in Shopify admin. Choose a plan and approve it in Shopify to continue to the app dashboard.
All plans include a 7-day trial. See the Shopify app plans for base prices, included try-ons and additional usage rates. The same app and plan are required when you use the older-theme setup.
Plans and usage
Choose a plan for your included try-ons and extra try-on rate. After your trial, successful try-ons beyond the allowance are charged automatically through Shopify. Failed generations do not count. You do not need to buy credit packs or enable an extra setting.
The Wearbly dashboard shows your usage, estimated additional charges and next reset date. Your allowance resets with your Shopify app subscription’s billing cycle, not on the first of the month. Unused try-ons do not roll over.
During the 7-day trial, you can use your plan’s included allowance with no paid extras. If you reach that allowance, try-ons resume when the trial ends and your paid billing cycle starts.
Already subscribed to an older plan? Your price stays the same and extras remain free for now. Choose Switch to usage billing on the dashboard to select and approve a new plan in Shopify. Previously free extras will never be charged retroactively. See pricing and billing examples for details.
2. Add Wearbly to a product template
- Go to Online Store → Themes and open the theme editor for the theme you are testing.
- Use the page selector to open Products, then choose the product template you want to edit.
- In the product-information section, select Add block → Apps → Wearbly AI. If that section cannot accept app blocks, check whether Add section → Apps offers it.
- Position the block near the product options or Add to cart button. Select the block to adjust its text, width and colors, then Save.
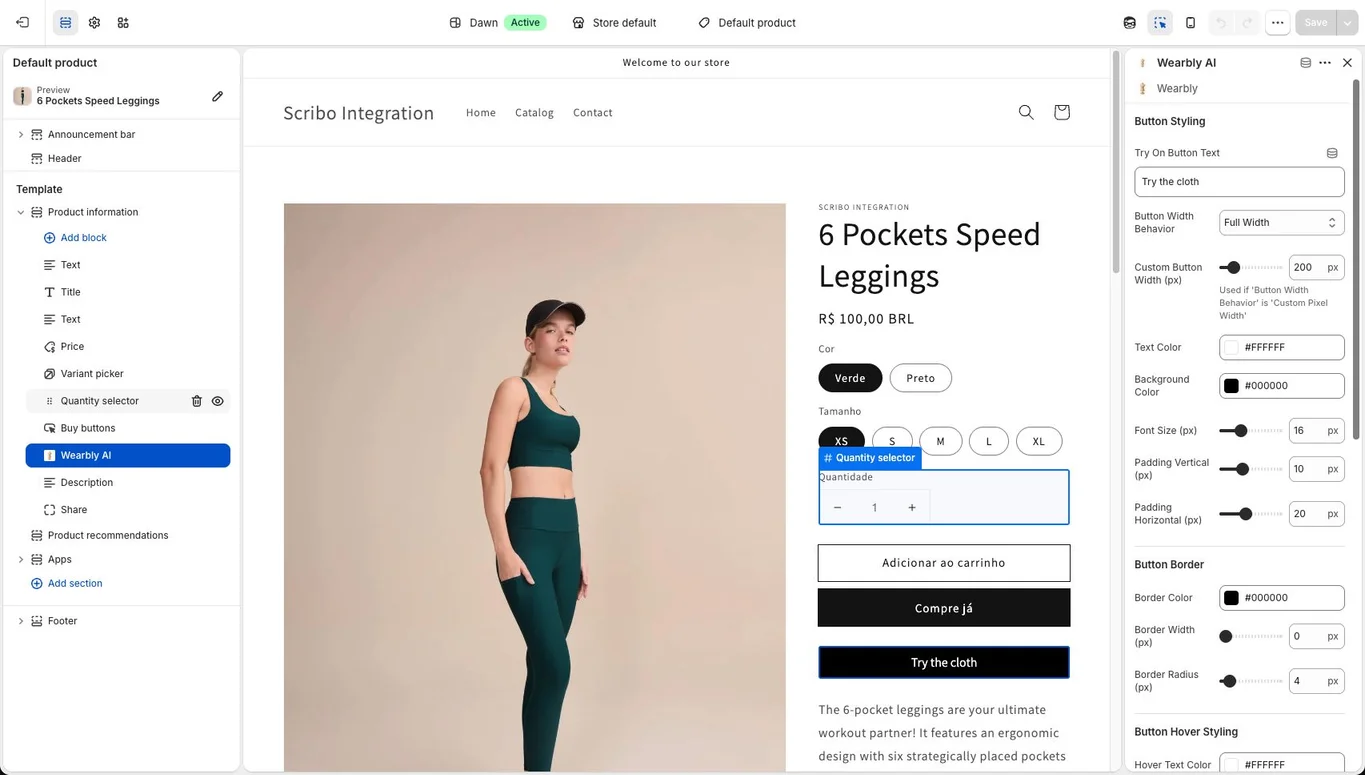
The Add Block button opens the current theme's product template. When you are working on a duplicate theme or another product template, open that theme and template directly in the theme editor instead.
Wearbly uses a product-page app block. Installing the app alone does not place the try-on button on your storefront. You do not need to look for a Wearbly toggle in Shopify's App embeds panel for this setup.
3. Choose where it appears
A saved block appears on products that use that template. If you use several product templates, add the block to each one you want to support. Confirm the assigned template on the product's page in Shopify admin.
In Wearbly's Restrictions settings, an empty category list allows the block on all products using the template. Once you add categories, it appears only when a product's Shopify category, or one of that category's ancestors, matches your list. These are product categories, not collections or tags.
In the theme editor, set a clear label such as Try it on and check its colors against your storefront. Preview desktop and mobile layouts.
4. Test before publishing
Open an actual product page in the theme preview and follow the shopper's path.
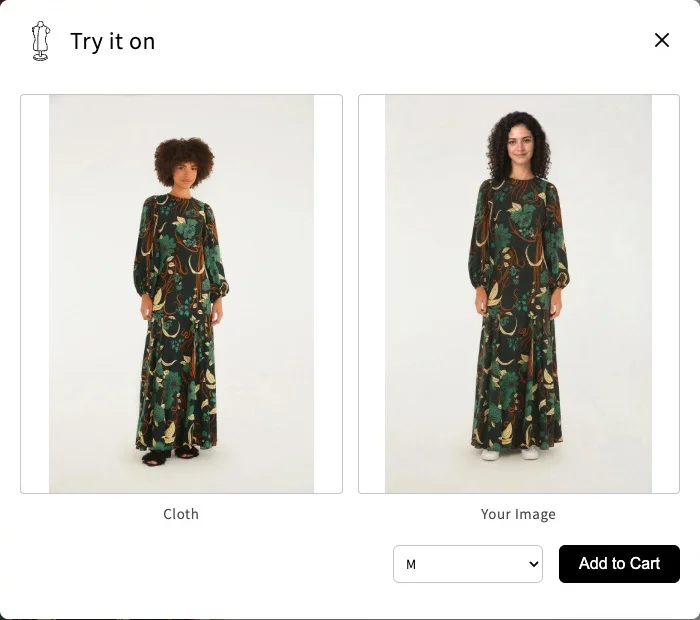
- Confirm that one try-on button appears and opens the dialog.
- Check the garment image and select an available size or color in the dialog.
- Upload a suitable photo and generate a preview. A successful generation counts toward your store's try-on usage.
- Use Add to Cart in the dialog. Inspect the cart to confirm the product and variant. You can test this without placing an order.
- Repeat the layout checks on mobile and on any other product templates that use Wearbly.
When the checks pass, publish the tested theme if it is a copy, then verify the button on the live storefront. Keep your original theme available as a backup.
Photos and product variants
Shopper photos
Use a clear, well-lit photo of one person with the relevant part of their body visible. Avoid heavy cropping or objects covering the clothing area. Upload JPEG, PNG or WebP images smaller than 10 MB. Convert HEIC photos before uploading.
Garment images
Use a product image that shows the garment clearly. Wearbly uses the selected variant's image when available and falls back to the product image. Assign images to color variants in Shopify, and check the variant in the dialog before adding it to the cart.
The generated image is a visual preview. It does not measure the shopper's body or recommend a size. Keep your usual size guide and product measurements available.
Something not showing up?
I cannot find Wearbly AI in Add block
Confirm the app is installed for this store and that you are editing a product template. Check another product section or Add section → Apps. A theme can have blocks without supporting app blocks. If Wearbly is still unavailable, use the older-theme guide or contact us.
The button is missing on a product
Check that you saved the correct theme and that the product uses the template you edited. Review Wearbly's category Restrictions. A configured list only shows Wearbly for matching categories.
The wrong garment or variant is selected
Confirm the selection inside the try-on dialog. Assign the correct image to each variant in Shopify. If a variant has no image, the product image is used. Sold-out variants cannot be selected for purchase in the dialog.
A photo fails to upload or a generation fails
Check the file format and 10 MB limit. Read the displayed error, wait for an active generation to finish and try again. If the problem repeats, send us the store domain, product URL and error message. Avoid including shopper photos.
Try-ons have paused after reaching the trial allowance
Open the Wearbly dashboard to check your usage and trial end date. Trial usage stops at the included allowance and resumes when the paid billing cycle begins. On a paid usage plan, additional successful try-ons are billed automatically up to the plan’s Shopify spending cap. See plan limits.
How do I check whether shoppers use try-on?
Open Analytics in Wearbly to compare app views, successful try-ons and attributed cart activity. Shopify customer consent can affect which events are available. Our observed results study explains what an add-to-cart comparison can and cannot tell you.
I see two try-on buttons
Keep one Wearbly block per product template. If your theme previously used the manual script, remove that manual integration before switching to the app block.
Using an older Shopify theme?
You can use the same Wearbly Shopify app with a manually placed script when your product template does not support app blocks. This route requires theme-code changes and store activation from the Wearbly team.
Read the older-theme setup guideWe can help with your setup.
Email [email protected] with your store's myshopify.com domain, theme name and the product page you are testing.
Shopify references: Install an app, Add apps to a theme and duplicate a theme.